$6 Trash or $6 Treasure?! Juno & Co Velvet Makeup Sponge Review

Juno & Co Velvet Sponge

Since the Beauty Blender’s debut on to the makeup scene the makeup sponge game has completely changed. That pink egg shaped sponge that really made me quickly abandon the foundation & concealer brushes that I grew up using. As much as I treasure the coveted Beauty Blender, the $20 price tag is one that I’m no longer willing to pay every 3 months for a replacement. So I want to find a sponge just as good as the Beauty Blender for $10 or less, that’s not a lot to ask for right? Where do I go to find such a sponge… the YouTube beauty community since someone has to know the answer there.

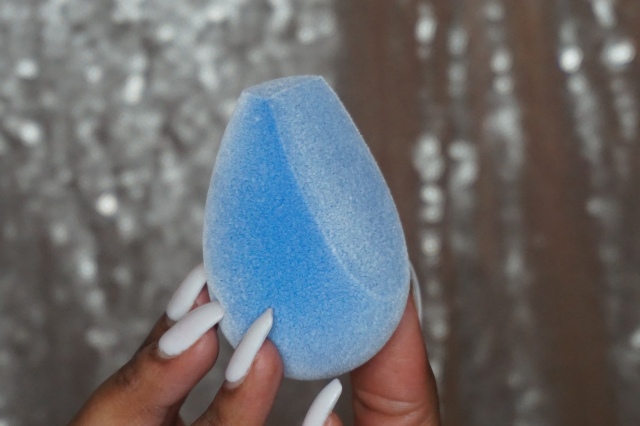
Influencer, Nikkie de Jagger, had an answer for a cheaper alternative to the Beauty Blender. She reviewed the Juno & Co Microfiber Velvet and deemed it as the world’s weirdest sponge. The cute blue makeup sponge is weird due to the fuzzy velvet finish and Nikkie loved the performance on her video here. I was intrigued and skeptical so I tried it and here are my thoughts.

  • The price is good. With a total of $6 before shipping and tax this is a sweet price for a reusable makeup sponge. Some other reusable makeup sponges will cost you anywhere from $16-$20.
  • The performance wowed me. This sponge does not hold on to  liquid products like other makeup sponges. With that being said it is best to start with less product to apply onto your face with this sponge.
  • The texture is weird. The velvet finish on the sponge does make it weird to touch. Usually a reusable makeup sponge is made of a polyurethane foam and has a weird finish. The velvet texture did not negatively impact the product application.
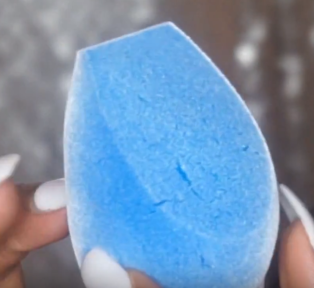
  • The functionality is a little tough. This sponge is more stiff than my Beauty Blender. Cleaning was also a little more challenging. After cleaning the sponge it started to crack (see photo below) which makes me question the durability of this makeup sponge.Juno & Co Velvet Makeup Sponge

Even thought the Juno & Co sponge had some wow moments, I will not repurchase the sponge. This sponge unfortunately is a $6 trash in my book.

Would you try this weird makeup sponge?

I also have a video showing my experience using this Juno & Co Microfiber Velvet Sponge below.


You Need Orange Blush

In the past I have been questioned on why I used blush with my deeper complexion. This question made me realize that people may not understand that deeper skin tones do benefit from blush. The truth is that blush is one of my favorite beauty products. Blush is so important to use on deeper skin tones because it gives a healthy glow!  I used to only use shades of red until I discovered how fabulous orange blush is!

So if you still have any hesitation about using blush (especially orange) I’m here to shut that down… right now! Orange blushes are great because these hues provide a natural glow without doing the most. The glow from orange blush is fresh compared to red hues that can feel a little more dated. Orange blushes can also layer well with reds and plums to enhance the flush of color & dimension without over saturating your cheeks with one hue. Think iconic bold 80’s blush glam modernized and way more flattering. Most importantly orange blush is extremely beginner friendly too!

In the video above I show you orange blushes that I love and also how to apply it for a perfect glow!

Here are the blushes that I feature in shopping links.

Cinnabar from La Femme https://go.magik.ly/ml/edij/ | Blush from Sleek Cosmetics Face Form Kit in Dark https://go.magik.ly/ml/crxd/  | Hot Flush from Sephora https://go.magik.ly/ml/edig/  | Ginger Binge from Fenty Beauty https://go.magik.ly/ml/6sih/

These links do provide me with a small commission and would greatly appreciate the support.

What’s Really Good? | TOO FACED Born This Way Foundation

So people have been ranting and raving about Too Faced Born This Way Foundation for a hot minute, but in usual style I’m last to the party. I’m a foundation skeptic because I feel like so many have disappointed me in shade range & finishing texture. Jackie Aina, YouTube beauty content creator, worked with Too Faced to improve the shade range in this beloved foundation so it had me asking… What’s really good?

Unlike my usual foundation adventures, I sampled and tried for 3 days before purchasing (thank you for Sephora). I ended up purchasing the foundation & concealer in the shade Maple.

So here’s the tea…

  • Compatibility with non Too Faced primer products B+. This duo held up under normal heat & humidity 99.9% of the time of wear with my normal primer from Smashbox. However, the duo broke up in certain areas in oil trouble areas when in extreme Miami heat walking around. Those areas for me are cheek & nose.
  • A little bit goes a LOOONNNGG way! This foundation is also easy to blend & comfortable to wear. Oh and the finish is gorgeous and skin like! All-in-all the formulation gets an A+.
  • The shade range is solid. I noticed in Sephora that next to the shade range the undertones were also listed. Combination undertones are also available. The website also provides a shade finder, which is quite a useful tool. This aspect of the foundation gets an A as well.
    • 35 shades for the foundation and 20 shades in the super coverage concealer.
  • The price for the foundation is $39 and the concealer is $29. This duo quite pricey… some other brands will only save you a few bucks, but if you value quality then this will not feel like a waste. I will stand behind the the price with a grade of A.

Overall this foundation had found a special place in my makeup collection & heart! The video will give you more of a visual and this foundation + concealer duo in action. Check it out and subscribe to my YouTube channel for more glam fun!

Bold Blues

I rarely wear cool tones, but something about any rich color make me want to play in shadow to create a sickening look.  This is the exact reason why I had to grab the MAC x PatrickStarrr “Me So Fleek” face kit.

This has 2 lip colors, a eyeshadow quad (that is GORGEOUS), and a duo blush. Priced around $50 that is a solid deal in my opinion.  The eyeshadow quad is my favorite without a doubt. In the video I show you how to get a look that is on fleek and will have heads turning in a good way. In fact I’ll show you 2. The first tutorial is my favorite look that is more bold. The second tutorial is more of a subtle pop of the captivating shade of blue. Which look will you try?

If you’re ready to purchase the kit click here!

Beyonce Beychella Hair for LESS!

Are you still living for Beyonce’s Beychella (formerly known as Coachella) glam? Well I am! Ever since seeing her Beychella glam I’ve been inspired by the stunning hair that went with all of her looks. I had to share this Beyonce inspired wig that is perfect for Summer 2018. Yes you can slay like Beyonce in the Lei wig by Zury Sis!

The Lei wig has probably been one of the most exciting to share since this length is so daring. This unit is extra long… we’re talking 40 inches! However do not worry it is wearable. Overall this unit is bold it is also a graceful style with effortless water curls. This type of wig is perfect to pair back to glowing makeup and bright pop of color on the lips.

The Lei wig can also be purchased for $50 or less. In the video right below I show you the wig up close! Shopping links are below as well, so you can watch the show & tell, then buy this wig for yourself.


Product Info: Zury Sis Beyond Synthetic Hair Lace Front Wig – BYD LACE H LEI

Color Shown: EARTH

What I’m wearing:

Sexy Valentine’s Day Glam

IMG_0372

Happy Valentine’s Day!!! I hope you all are using this as the perfect excuse to spend the day putting you first! That could be like me, which will be in a bubble bath, or on a sexy date. Regardless of your dating/marital status make this day about YOU and your loved ones!

The holiday has inspired the look I created in the photo above. I would like to say I created this look to wear for any  of your glam needs, Valentine’s Day or not! My favorite part about this look is that I used an affordable palette, YAY! The Royals palette by Bad Habit Beauty is the featured eyeshadow palette for this look. The whole color scheme is gorgeous  & dreamy ❤ See the video below for the tutorial and below are product details.

Products Mentioned

Disclaimer – This post features complimentary product provided by Shop Hush and also monetized links from http://www.magiclinks.org


Date Night Glam

IMG_9114

Are you ready for some glam to get you ready for Valentine’s Day or even a night out with friends? The other week I created this date night look (photo above) on my YouTube channel. I really like this look and it’s pretty easy to wear even if you’re not into too much color. My tip to experiment with more rich/bold eye looks is to balance your overall look with a more neutral lip color. The lip color that I’m wearing is NARS Slow Ride. This is one of my favorites and pretty much the perfect nude (I would toss all of my others to keep this one). Also the formula for a liquid lipstick is so amazing and nothing I have compares to it. The palette I used is only $12 and compared to the colors found in the Huda Beauty Desert Dusk Palette.

Below is the tutorial where I show you how to achieve the look. The great thing is that you can follow at your own speed and it’s like we’re doing our makeup together.

Tutorial

Products Used

EYES

  • Athena Palette (Shop Hush App here)
  • NXY HD Eyeshadow Primer here

FACE

  • La Femme Blush in Grape here
  • Wet-n-Wild Crown of My Canopy here
  • Fenty Pro Filt’r Foundation & Match Sticks (not shown in tutorial)

LIPS

  • Chestnut Liner here
  • NARS Slow Ride here

This post contains affiliate links through Magic Links. Shopping with my affiliate links helps to support the efforts of this blog and my YouTube channel. Thank you for the support.

Nordstrom Rack Haul | Budget Fashionista


Hey babes!!! I love being able to shop without breaking the bank!

I always loved to follow trends, and I’ve always been a admirer of designer & trendy fashion. While I love fashion my mom and I didn’t have a large budget for it. I wasn’t the cool girl in school wearing Coogi, Dooney & Burke, Coach, or Ecko… so needless to say I had to learn how to work with what we had in the bank.

I knew how to spot quality pieces and determine when to save, splurge, and/or pass. So how do I shop?!

I tend to not invest too many coins into trendy pieces for clothing. I splurge on bags and accessories every now and then.  I tend to try to find designer inspired shoes.  For splurges I tend to think about the cost per wear (CPW) to see if it’s really worth it. For example a pair of classic black pumps for $100 that you can wear to work 3 times per week for a year will be a CPW of 64 cents. (100/3= $33.34 per day and $33.34 per day/52 weeks = $0.64) Hope that makes sense 😉

My go to place for fashion at a price is Nordstrom Rack. I have done a lot of budget shopping at Nordstrom Rack for years and it’s worked quite well for me because I can find what I need to cure my fashion addidction.  I was always able to find quality for a decent price at Nordstrom Rack. I also love that you can shop Nordstrom Rack online.

Where is your favorite place to shop deals?!

❤Items I was able to find online!❤
Dual Nature Kimono here |Lush Dress here | BP. Cardigan here | Slippers here | Shoes here 

❤❤❤DISCLAIMERS❤❤❤
All products featured in this video were purchased by the creator of the video.

I use MagicLinks for all my ready-to-shop product links. Check it out here: https://www.magiclinks.org/rewards/referral/lipstickan/

This video and description contains affiliate links, which means that if you click on one of the product links, I will receive a small commission at no cost to you. This helps support the channel and allows me to continue to make videos like this. Thank you for the support! ❤❤❤

How to Apply Lashes | Affordable Lashes

Hey everyone! Last week I uploaded a video on how to apply lashes. I love to use lashes because my natural lashes frequently ride the struggle bus (sigh). While I love mascara sometimes the look that I’m going for requires a lash to amp it up.

Recently I found a company that sells super affordable lashes and they are of BOMB quality. Your Lash Bar has a nice variety of styles. I was soooo excited to try these lashes and I fell in love with the style Dirty Martini. I also love the prices and Your Lash Bar offers bundle deals, 3 for $15 and 5 for $25.

Regardless of the brand or style this is how I apply my lashes. Below in the video I show you these steps in action.

  1. Prep my lash line in 2 ways
    1. Tight line my water line with a pencil liner. My favorite is the NYC kohl liner
    2. Line the lid. I prefer a liquid or cream liner for this step. I usually make the line super thin or if you prefer a winged line this is when you can do that.
  2. Prep my lashes with mascara and curl if needed.
  3. Measure the lash and trim from the outer side if you need. You want the lash to fall into perspective with your natural shape.
  4. Thinly apply 2 coast of lash glue (no it doesn’t matter if you use clear or black glue).
  5. Let your glue get tacky by drying it for about 15-30 seconds. This is so important because your lash won’t have so much slip when you put it on.
  6. Put the lash to your lash line and start to secure. I like to secure the center and then the corners.
  7. Let it set and can blend the strip with a little more liner to conceal if needed.
  8. Then you can blink away!!! This is the equivilant to a hair flip after a fresh style or wig in my case 😉

Blonde Bombshell Wigs

IMG_7284
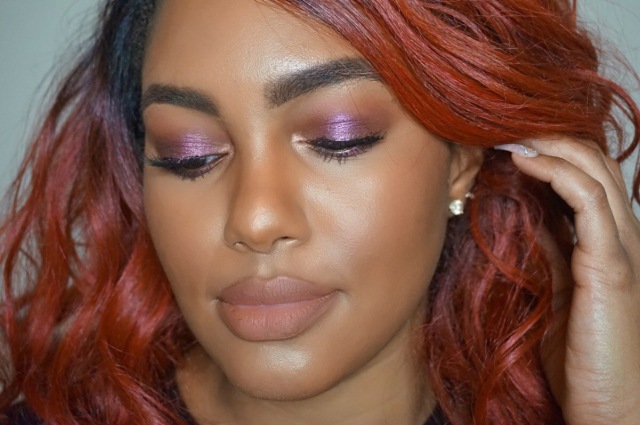
My own journey has been quite the journey and can be a separate post alone . As much as I love wearing my natural hair & curls I really minimize the amount of chemical and heat manipulation I do to my hair. I’ve been craving a change in hair color for some months now and luckily I have wigs to the rescue to help.

Blonde wigs have been my THING lately! I love ombre blonde wigs because they are so gorgeous when the color is on point! I mostly use ombre colors because they give you color and are easy to pull off! I have 2 blonde wigs that I’ve gotten an overwhelming amount of compliments  on that I will share with you today. Both will have full YouTube reviews at the end of this post for you to check out!

The first video below features the Bobbi Boss Misha Wig. It is a lace front wig with synthetic hair fibers. She is a straight hair unit and the blond color (TT6/1010) leans towards the ashier side. The roots of this wig are a dark brown. This hair isn’t super voluminous, which can be a con because you don’t want a thin wig if you have a larger head; nevertheless the look is very sleek. I do have a larger head and I do not mind this density.

The second video features the Zury Sis Slay Olive Wig. This is another synthetic lace front wig. This style has BEAUTIFUL waves to it and lovely volume. Out of the 2 wigs this one is my personal favorite. This blonde color (SOM RT Pearl Blonde) is more creamy compared to Misha and the roots are darker.

Both wigs are heat safe up to 350 degrees fahrenheit. I rarely put heat to synthetic wigs that already have wave or curls. I have used heat tools on straight styles just to sleek them out a little more.

The best benefit is the price! These wigs won’t have you forking over too many coins to look fabulous and are usually available for under $40.

Check out the 2 videos below for more information and an up-close look at these wigs.

xoxo Anissa